Monday, 28 November 2011

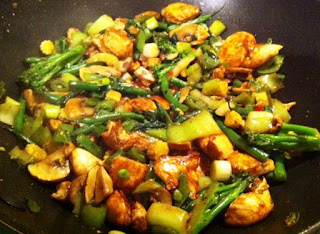
King Prawn Pad Thai

I harp on alot about my love of Asian cuisine, particularly Thai. Before my husband and I opened our cocktail bar I worked in a local pub, The Grotto in Weybridge, Surrey which had a dining room serving up authentic Thai food. I loved working in the small restaurant part of the pub and learnt alot about food preparation there.


Toy, the Thai chef managed the kitchen virtually single handedly. Of course she had no method in managing the fast orders coming through (for takeaways as well as diners).  She did each ticket in turn, but everything she cooked was always incredible. I'd watch her hand rolling the vegetable spring rolls, preparing fresh satay sauces and stirring the Massaman curry whilst it stewed away. My love for Thai food really came from working here. She'd often send me off home with a garlic chilli squid stir fry or if I was lucky, my favourite: Pad Thai. I don't think I can ever hope to re-create Toy's amazing Pad Thai (and I'm certain I wouldn't want to ProPoint it!), but Pad Thai is still my dish of choice when I go to a Thai restaurant. I've tried for the last few years to cook a really tasty Pad Thai that is WeightWatcher friendly and delighted to have finally achieved it with this recipe!

Earlier this year I re-visited a newly refurbished Grotto as the new owner had managed to lure Toy back into the kitchen. The menu was just the same as it ever was and amazingly Toy remembered me from my stint there in 2002! I only worked there for a short time but she knew I went on to more glamourous things when we opened our cocktail bar down the road.  I've sadly heard that The Grotto has once again re-closed. I do hope someone snaps it up and gets Toy back in the kitchen as Weybridge will not be the same without her delicious Thai food.

You'll need for 2:
  • 1 tsp groundnut oil or vegetable oil
  • 1 garlic clove, crushed or grated
  • 175g raw king prawns
  • 1 medium egg, beaten
  • 25g roasted, salted peanuts, finely chopped
  • 1/2 tsp chilli flakes
  • Asian vegetables of your choice, sliced to your liking
  • Couple of big handfuls of beansprouts
  • 3-4 spring onions, sliced
  • 1 tsp soft brown sugar
  • 2 tbsp soy sauce
  • 2 tbsp fish sauce
  • 1 lime, juiced
  • 125g rice noodles, soaked in hot water then drained
  • Fresh coriander leaves

What to do:

Firstly get the kettle boiling and put the rice noodles into a shallow dish. I use the Pad Thai thick style noodles which are available in Waitrose. Please do not buy the 'straight to wok' rice noodles as these are just horrible and will ruin what is a most fabulous supper! Pour the boiling water and leave to soak for 15 minutes while you prep the other ingredients.

Get everything chopped up and ready and have all the sauces and condiments to hand as the dish doesn't take long to stir fry.  Beat the egg in a bowl with a dash of light soy sauce for seasoning.

When the noodles have finished soaking, drain until needed.

In a wok, heat the oil and when hot add the prawns and garlic. As soon as the prawns are pink all the way through remove with a slotted spoon, keeping as much of the juice in the wok as possible.  Add the vegetables and stir fry on high heat for a minute or two. Quickly add the chilli flakes, fish sauce, soy sauce, lime juice, sugar and peanuts stirring frequently.  

After a couple of minutes of stir frying, add the prawns back in and any juices along with the noodles.  Add the beaten egg and stir everything for another minute or two until the noodles are nicely coated.

Serve up and sprinkle with fresh coriander.

WeightWatchers ProPoints Per Serving: 12

    Lancashire Hotpot

    I love tucking into a roast dinner on a Sunday, but sometimes it's just not possible to spend hours in the kitchen especially since I was coping with a hangover and 4 hours sleep after hosting a very lovely early Xmas gathering on Saturday night. So on Sunday, in between looking after 2 energetic boys, going to a kids party and tidying up from the previous night's antics, I wanted to cook something quickly that was warming and comforting and something that was the perfect hangover food. 

    Feeling guilty from the amount of bubbles consumed the night before, my chosen dish needed to be most definitely healthy but tasty! The end result was a Lancashire hotpot. I felt compelled to include this in my food blog as I am sure there are many of us who crave a comforting Sunday lunch without busting the diet.


    The Lancashire Hotpot was particularly fitting for yesterday, Sunday 27th November as it was Lancashire Day. So what better way to celebrate it then by making a very famous dish originating from the area itself.  Although it takes a while to cook, the preparation takes just 20 minutes or so and you can get on with a million other things whilst the stew takes care of itself. Perfect for us busy mummies!

    I couldn't resist adding some ale to bring out the flavour of the lamb and the kidneys and selected Thwaites Lancaster Bomber which is a chestnut colour ale, full of warmth and richness. It complimented the dish perfectly and this addition made the hotpot that bit extra special.

    You'll need for 4:
    • 900g diced lamb, such as Sainsburys Be Good To Yourself range
    • 6 lambs kidneys, cut into pieces, sinew removed
    • 1 large onion or 2 smaller ones, peeled & diced
    • 4 or 5 medium carrots, peeled and diced
    • 3-4 sticks of celery , peeled and diced
    • 2 big garlic cloves, sliced
    • 3 sprigs of fresh thyme
    • 2 bay leaves
    • Few dashes worcester sauce
    • 500ml lamb stock
    • Seasoning
    • 1 & 1/2 tbsp plain flour
    • 125ml Lancaster Bomber ale (about half the bottle, drink the rest with your meal!!)
    • 1-2 tsp butter, melted
    • 750g potatoes, peeled and sliced thinly

    What to do:

    Pre-heat your oven to 160C/fan 140C/gas 3.  In a large heavy based saucepan, heat the olive oil. Brown the lamb all over, in batches if need be. Remove using a slotted spoon and keep to one side. Add the onion, celery & carrots to the pan with the garlic and stir well. Cook on a medium heat to soften the vegetables. Put the lamb back in and season. Sprinkle over the flour and stir it in well to cook out the flour. After a minute or two add the ale and stir continuously to prevent any lumps forming. Then add the lamb stock, bay leaves and thyme along with the Worcestershire sauce.

    Give everything a good stir and add more water if need be.  Allow to cook on a low heat for a few minutes then remove from the heat. Transfer to another dish if your saucepan is not ovenproof, and add the potatoes overlapping the slices.  Cover with a lid or foil lid if in a roasting dish and place in the oven for a good 1 and half hours.

    Remove the lid for the last 20 minutes, brush with the melted butter. Turn the oven up high to help brown the potatoes.


    Serve with green vegetables of your choice.

    WeightWatchers ProPoints Per Serving: 15

    Tuesday, 22 November 2011

    Food Bloggers Unplugged

    Me!
    Thank you Susan from A little bit of Heaven on a plate for starting this cool idea and for Kate at TurquoiseLemons for tagging me!

    The idea is to pass it on or to tag 5 other food bloggers and answer 10 questions about yourself in the process.  So here goes...


    1. What/Who inspired you to start a blog?
    I've always been a huge foodie, loved eating out and cooking at home. Having run a cocktail bar for 3 years and then having kids I embarked on WeightWatchers to shift baby / general weight. I realised that 'diet' food was generally very unappetising and forget about filling a hole! So I learnt new ways of cooking using minimum fat, lean meats, plenty of vegetables so that every meal I ate was healthy, filling & tasty. Friends were interested in my recipes so I thought I would share it with the wider world and started my blog

    2. Who is our foodie inspiration?
    I take great inspiration from most of the TV chefs. Always been a Nigella fan but loving Lorraine Pascale. I often try and re-create their dishes with a healthy makeover. My mum has also taught me loads. I also love Ching He Haung as her cooking is really scrummy and naturally quite healthy.

    3. Your greasiest, batter splattered food/drink book is?
    Nigella's Feast is well used. I've made her birthday custard sponge every year for my childrens birthdays, usually carved & iced to resemble some monstrosity. The latest was my 5yo superhero cake.

    4. Tell us about the best thing you have ever eaten in another country, where was it, what was it?
    10 years ago, my husband and I went on holiday to Mykonos (pre-kids obviously!) A friend's father lived there and she arranged for him to take us out. We experienced the best meal ever! We chose our own lobsters from a pool, ate fresh sea urchins with lemon and olive oil (he'd called the fisherman up the day before and asked him to catch us some) and feasted on a platter of the freshest fish I've ever had.

    5. Another food bloggers table you would like to eat at is?
    Hmmm I am fairly new to this blogging and just getting to know these fellow food bloggers. I was amazed by some of the wonderful treats I saw recently at Lets Make Christmas and it was all organised by the wonderful Vanessa Kimbell. Reckon there's alot I could learn from her so lunch or dinner would be fab Vanessa?!

    6. What is the one kitchen gadget you would ask Santa for this year (money no object of course)?
    I would LOVE a kitchen aid. In red please to match the other titbits in my kitchen. Thanks Santa. Promise to be a good girl.

    7. Who taught you how to cook?
    I learnt alot by myself. Once I'd established myself I think I then went to my mum for inspiration. It's only now in my mid-30's I feel a duty to learn her repertoire and pass it down through my family. Many of her recipes are on my blog.

    8. I’m coming to you for dinner. What’s your signature dish?
    Oh lordy! This is a hard one! A starter of scallops with black pudding on a rocket salad. A main of slow cooked lamb shoulder flavoured with garlic, anchovies & rosemary with roast potatoes and green beans. For pud maybe a chocolate fondant or a sticky toffee pudding.

    9. What is your guilty food pleasure?
    Cheese or any kind. Soft, strong, hard, smelly, so long as its cheese accompanied with a large glass of red wine!

    10. Reveal something about yourself that others would be surprised to learn?I did a dance & drama degree at The University of Birmingham a few (ahem) years back.

    Now to pass on the challenge to 5 other food bloggers...#foodbloggersunplugged

    @CornerCottageB - Hannah Allman
    @craftstorming - Laura Tichener
    @Benjaminvear - Ben Vear
    @katecakeandbake - Kate Harries
    @BakingCindy - Food for thoughts


    Monday, 21 November 2011

    Paella

    Paella is a bit of a Friday night treat in our house. Usually mid-week suppers consist of something that can be easily prepared in advance with little or no finishing once the kids are in bed. But on a Friday it's nice to eat a bit later, enjoy a nibble on some olives, carrots & reduced fat hummus while I get dinner ready, glass of wine in hand of course. I find on WeightWatchers if I'm really religious during the week, come Friday, I can afford a glass of wine or two along with dinner. I still try to keep to a healthy meal on a Friday (that's 12 ProPoints in my book) but it's usually something that takes a bit longer to prepare.


    We are quite traditional in that white wine is largely summer drinking and most definitely when eating fish, and red wine is mostly for the winter and always to accompany red meat. Paella works well with either but a splash of white wine does work particularly well with the stock bringing out more flavour.

    My paella uses chicken breast, raw king prawns, lots of red pepper & peas and it wouldn't be Paella without the use of saffron and cayenne pepper! My hubby has an allergy to some seafood but otherwise I would use the bags of frozen mixed seafood containing mussels, squid etc, but use whatever you like to suit your own taste.

    You'll need for 2:
    • 1/2 onion, finely chopped
    • 1-2 garlic cloves, crushed or grated
    • 1 red pepper, chopped
    • 2-3 tbsp frozen peas, I use petits pois
    • 1 medium chicken breast (165g), chopped
    • 50g chorizo
    • 1 tsp olive oil
    • 150g Paella rice
    • 1 big vine tomato or a few cherry tomatoes, roughly chopped
    • Pinch of saffron
    • Pinch of cayenne pepper
    • 1 tsp smoked paprika or normal paprika
    • 1 bay leaf
    • Liquid chicken stock concentrate or stock pot
    • 1 lemon
    • 100g (about half a bag) of raw frozen king prawns, defrosted
    • Boiling water from the kettle
    • Glug of white wine (optional)
    • Seasoning
    In a large non-stick frying pan, heat the oil and gently saute the onions and garlic until slightly golden. Turn up the heat slightly and add the chorizo and chicken. Brown all over.

    Weigh out the rice into a measuring jug and make a note of where it comes up to. Add the rice to the pan and stir frequently to coat the rice.  Double the volume of rice with boiling water and chicken stock concentrate into your measuring jug.  Add the saffron to the stock and allow to dissolve.  Add the white wine if using or if not use a little of the chicken stock.

    Add the pepper & tomatoes and stir well. Add about half of the chicken stock, the spices and bay leaf. Give it a good stir and allow to simmer for 10 minutes. Add the peas.

    Keep stirring every now and then and top up on some stock when it starts to look a little dry.  It should take about 20-25 minutes for the rice to cook through. A few minutes before the end, add the prawns and a good squeeze of lemon (about half a lemon). Taste and season accordingly. Cook until the prawns are pink throughout and serve up with lemon wedges.

    WeightWatchers ProPoints Per Serving: 13

    Thursday, 17 November 2011

    Cherry & Macadamia Chocolate Fudge

    My last entry in the Lets Make Christmas event is this wonderful fudge which is full on flavour with unique textures. I used cherries soaked in Kirsch and macadamia nuts which marry perfectly together with the richness of the dark chocolate fudge.  As far as giving this as a homemade Christmas gift goes, it far out ways any old plain vanilla fudge!  So if you plan on making fudge this year, give this combination a go.

    The basic fudge recipe I started with was from BBC Good Food. I found an old pot of liquid glucose in my cupboard so managed to cook the first batch using this, but after that locating this pot of sugary stuff was pretty challenging. Waitrose didn't have it, neither my local chemists and I did not have time to get to Tescos, so my 2nd batch used golden syrup instead.  I can't say I noticed a difference so my advice is to use whatever you have, which, let's face it, is more likely to be golden syrup.

    I also really like this basic fudge recipe as it doesn't require so much effort like other methods where you must continuously stir for 20 minutes. I chucked everything in my good, solid based saucepan and let it heat up till it reached the soft ball stage, 116 degree c. I decided last week to invest in a sugar thermometer from Amazon and it was a fiver very well spent .  It meant I could get on with other things without worrying too much about when the fudge was ready. You know how us mums are always trying to juggling a million things at the same time!


    I also found that you don't need to melt the chocolate in advance as the fudge mixture is so blinkin hot (well it is 116 degree c!) that as soon as you stir the chocolate in it just melts immediately.

    So although I started with BBC GoodFood, my recipe and method is here...

    Ingredients:
    • 300g caster sugar
    • 300ml double cream
    • 40g liquid glucose or golden syrup
    • 100g dark chocolate, broken into pieces
    • 125g dark cherries soaked in Kirsch, drained and halved
    • 100g macadamia nuts
    You will need a 20cm square tin or one of equivalent dimensions

    Method:

    In a heavy based saucepan add the sugar, syrup or glucose & cream. Stir on a medium heat to dissolve the sugar. Get the thermometer in place so it can adjust as the mixture heats up.

    On medium to high heat, give the mix a good stir every couple of minutes. Meanwhile prepare your tin by lightly greasing and base lining with baking parchment.

    Break the dark chocolate into pieces, drain the cherries and halve and halve the macademia nuts if not already halved.  I also patted dry the cherries with kitchen towel so as not to make the fudge too 'wet'.

    The fudge mixture should take 10 - 15 minutes to reach the right temperature. Turn the heat up if need be. If you do not have a sugar thermometer you can do the 'soft ball test'. Simply drop a tiny amount of mixture into a glass of iced water. The mix should form a soft ball immediately. It really is so much easier with a thermometer though!

    Once ready, remove from the heat and quickly drop in the chocolate pieces and beat with a wooden spoon  for a few minutes until the mixture is grainy and comes away from the sides.  Quickly stir in the nuts and cherries and pour into the tin. Smooth out and allow to cool slightly.  Score with a sharp knife and allow to cool completely transferring to a fridge when cool.  Cut into squares and store in the fridge.

    I'll be packaging these up in pretty cellophane bags tied with ribbon when they go into my homemade Christmas hampers this year and hoping they will go down a storm! (The trial batch were very popular at the mum's coffee morning anyway!)

    Ginger & Lemon Shortbread

    Shortbread is an ideal foodie gift to give at Christmas as it has a pretty good shelf life if stored correctly, that's if it lasts that long! Whilst I appreciate shortbread in all it's traditional wonderfulness, I couldn't help but want to add a hint of flavour and texture to this wonderful treat. I experimented with a few recipes and my final version was really a culmination of everything I tried with my own twist using lemon & stem ginger.

    This shortbread will go to a fellow food blogger at Vanessa Kimbells Food Blogger Gift Exchange tomorrow at Fortnum & Mason. I hope whoever gets it will like it!  I am very excited to be taking part and meeting other foodie fanatics like me!

    Ingredients:
    • 115g soft unsalted butter
    • 50g caster sugar plus more for sprinkling
    • 175g plain flour
    • Pinch of salt
    • Zest of 1 lemon
    • 75g stem ginger, finely chopped
    You will need a 20cm round tin, preferably loose bottomed. Lightly grease with butter

    Method:

    • Pre-heat your oven to 170c or 160c fan
    • Beat together the butter and sugar
    • Lightly stir in the flour and salt and start working it to form a dough like mixture. Be careful not to overwork the mix as the butter may get too greasy.
    • Add the finely grated lemon zest (I use a microplane for this, but any fine grater will do) and the sticky sweet stem ginger. Give it a rough mix with your hands
    • Tip the mix into the tin pressing with your fingertips to even it out.
    • Using a fork, crimp the edges all the way round and then make several pricks all over. I like to score the mix into 8 wedges before it's cooked.
    • Bake for 35-40 minutes till lightly golden
    • Remove from oven and cut into 8 wedges.
    • Sprinkle over a tbsp or so of caster sugar
    • Allow to cool on a wire rack for a few minutes and then remove from the tin and allow to cool completely
    • Store in a airtight container or tin. It will keep nicely for a good week  

    Friday, 11 November 2011

    Christmas Chutney

    This year, I am hoping to replicate the success off the Xmas hampers I gave to family and friends 2 years ago. I spent hours upon hours in the kitchen, with a rather large tummy bump, (7 mths pregnant!) stirring, chopping and blitzing ingredients together to make a perfect batch of Christmas treats.

    The contents of this year's hampers are still 'work in progress' but ideas so far are:
    - Christmas Chutney; perfect accompaniment to cheeses and cold cuts. Done, dusted. Jarred.
    - Basil pesto; delicious stirred into pasta or smothered on warm ciabatta. A sure cert especially with all our Italian family.
    - Fudge; testing out different flavour combinations at the moment...
    - Shortbread; cut into festive shapes. A great way to get my 5yo involved
    - Something involving stem ginger...there's alot of love for ginger among my family & friends!

    Back to the chutney. As of yesterday, these are cooked, jarred and maturing away so they are perfect to eat at Christmas. I've always made a Christmas chutney with apples and cranberries. The first recipe I ever used was from my highly trusted BBC Good Food.  I then made other versions which included plums, then figs. This year the base for my chutney was taken from Hugh's River Cottage on Channel 4.  I made a few changes to suit my own taste, which include adding fresh cranberries & cinnamon. I also omitted cardamom pods as I'm not a fan.  My exact recipe is detailed here.

    My batch made some 18 jars!  Feel free to halve the quantities or play around with what suits you.

    Ingredients:
    Weighing out apples
    • 1kg onions, chopped
    • 1 tbsp vegetable oil
    • 1kg bramley apples, peeled and chopped into large-ish chunks
    • 1kg eating apples (Cox's, Braeburns, Pink Lady etc),peeled and chopped into small-ish chunks
    • 1 litre cider vinegar
    • 800g demerera sugar
    • 250g dried figs
    • 250g walnuts, roughly chopped
    • 250g dried cranberries
    • 200 fresh cranberries (or use frozen, defrost first)
    • Zest & juice of 2 large oranges
    • 200ml port
    • 25g root ginger, grated
    • 12 cloves
    • 2 tsp coriander seeds
    • 1 tsp salt
    • 3 tsp ground cinnamon

    Method:

    In a very large saucepan, heat the oil and sweat the onions for a few minutes.

    Add the apples, sugar and vinegar and stir to dissolve. Bring to the boil and add the dried fruit, herbs & spices. Add the orange zest and juice and the port.

    Chutney Cooking

    Cook for a good hour on a simmer until the liquid has reduced significantly, stirring occasionally. Add the fresh cranberries and the walnuts and continue to cook for another 30-45 minutes.

    Pour into washed, sterilised jars whilst hot and place lids on.

    Leave to mature for a few weeks so it is perfect for Christmas! I'm already dreaming about tucking into the chutney on Christmas day along with my favourite cheeses...

    The finished chutney!

    Monday, 7 November 2011

    Chicken Chow Mein

    I reckon not a day goes by where I don't pick up a recipe book,  watch a cookery programme or browse the web looking for new recipes and food ideas. My blog is not just a collection of my own recipes but recipes that I have found that I've adapted to fit my overall criteria; healthy, low fat but very importantly, tasty & filling. I follow all the celebrity chefs on Twitter and love experimenting with some of their recipes. Whilst I just love cooking new recipes, my problem is that I have to give them a low fat / healthy makeover. 


    When it comes to Asian cuisine, my favourite Chef has to be Ching He Haung. She's like a modern day Ken Hom. What I love about her cooking is that it is naturally healthy, utilising the best in Asian ingredients to bring out full on flavour.  Since I've been a Ching fan I now regularly store items such as Sake and Shaohsing wine! 

    I made very little change to Ching's original recipe, just reducing the oil to bare minimum and weighing out noodles and chicken to calculate correct ProPoints. The original recipe can be found hereI've got to say that this chicken chow mein dish could not be any healthier or tastier. I pack it with vegetables and it really is a quick, easy, bloomin tasty mid-week supper.

    You'll need for 2:
    • 2 x 60g portions of egg noodles
    • 2 x 1 tsp groundnut oil or vegetable oil
    • 275g chicken breast, cut into pieces
    • 1-2 tbsp dark soy
    • 1-2 tbsp light soy
    • 1 tsp Chinese Five Spice
    • 1 tsp chilli sauce
    • 1 dsp cornflour
    • Stir fry vegetables of your choice. e.g. green beans, mushrooms, sugarsnap peas, pak choi, broccoli carrots, peppers etc.
    • A few spring onions, sliced

    What to do:

    Slice up the chicken and sprinkle with Five Spice and a good dash of dark soy.

    Get the noodles on the boil as per packet instructions and get your wok / stir fry pan nice and hot. Add 1 tsp oil to the pan and stir fry the vegetables until cooked but still with a nice crunch. Season with some light soy as you stir fry and add a sprinkling of Five Spice.

    Remove from the pan and keep warm. Heat the other tsp of oil. Sprinkle the cornflour over the chicken pieces and place into the hot pan to stir fry. Chinese cooking frequently uses cornflour to thicken sauces. It's a great, low fat technique and I love it's use here in keeping the chicken really nice and moist and this stage shouldn't be omitted!!

    Allow the chicken to brown and turn occasionally. Add a couple of dashes of dark soy and once cooked through add the vegetables back into the pan. I prefer to cook the vegetables and chicken separately so as not to overcrowd the wok and to ensure everything stir fries rather than stews together. Also I use ALOT of vegetables so I need the extra room in the wok!! A couple of minutes before the end of cooking, add the spring onions and stir through.

    As soon as the noodles are cooked, drain and return to the pan stirring through a dash of light soy sauce until needed.

    Finally add the noodles to the wok and toss everything together and serve up. This dish can be prepared in under 15 minutes! I like to get all my ingredients prepped earlier before I get the kids to bed so everything can be literally stir fried in a matter of minutes.

    WeightWatchers ProPoints Per Serving: 12

    Sunday, 6 November 2011

    Chicken Biryani

    The Anglo-Indian influence in my family has inspired me to learn the dishes that my parents grew up with.  My mother was largely brought up by her Grandmother in India after losing her mum very young and she learnt to cook from her Grandmother. I love the way families pass down their recipes and traditions and I feel it is absolutely essential we carry on in the same vein. With DH's family being Sicilian we have quite a repertoire of Italian and Anglo-Indian dishes now which we hope will enrich our tastebuds and give our children a sense of worldly cuisines.


    On the WeightWatchers plan, a typical restaurant Biryani would cost you an entire day's worth of ProPoints and it would certainly bust any calorie controlled diet. I now know why biryani dishes are such a no-no on a diet as there is virtually no portion control on the rice and they are laden with fried potatoes!  My aim in making this an Eat Healthy But Tasty dish was to get a fulfilling, flavoursome and authentic tasting meal. I was going to have to ensure not too much rice was used and find a way of roasting the potatoes with minimal fat.

    I chose a day when my parents were visiting to make this, ensuring I got the spice mix down correctly. I should have expected mum would have a thing or 2 to say about my version...

    Mum stated that "double the rice should be used for that amount of chicken curry". I explained to mum that using double the rice, plus the potatoes would make it a right old carb fest and just way too ProPoint /calorie /fat heavy. Mum also stated that Biryani is meant to be a dry dish and the way I was doing it would result in the dish being too "wet".  The thing is I actually prefer a bit more sauce in my Biryani and, dare I say it, feel mum's way is a bit too dry (eek!).  Much to my mother's disgust, the problem was resolved, for me anyway; less rice + more curry = moist, tasty, healthy, Biryani.

    You'll need for 4:

    • 1-2 garlic clove, crushed or grated
    • 1 tbsp sunflower oil plus 1tsp extra
    • 1-2 tsp fresh ginger, grated
    • 1 cinnamon stick
    • 2 cloves
    • 2 cardamom pods
    • 1 onion, finely diced
    • 1 level dsp cumin
    • 1 level dsp paprika
    • 1 level dsp garam masala
    • 1 tsp tumeric
    • 2 dsp Pataks Biryani paste
    • Squeeze of fresh lemon juice
    • 3 dsp fat free natural yogurt
    • 450g chicken breast, cut into chunks
    • 300g charlotte potatoes, halved lengthways then cut into 4 or 6 pieces each half
    • Salt
    • 285g basmati rice
    • Good pinch of saffron
    • Half a pack of green beans, halved
    • 2-3 tbsp frozen peas and sweetcorn or frozen mixed veg

    What to do:

    This is an ideal meal for preparing in advance. There are a few steps to complete when creating this dish: roast the potatoes, make the curry, boil the rice, bake the lot together...

    In a non-stick roasting tray or dish place the potato chunks. Sprinkle with salt and drizzle over a 1-2 tsp vegetable oil. Using your hands rub the oil in thoroughly and place in a hot oven (200c fan) for about 20 -25 minutes until the potatoes are soft on the inside and crispy and brown on the outside.

    For the curry, 2-3 tsp sunflower or vegetable oil in a saucepan.  Add the cinnamon stick, broken, the cardamom pods and cloves. After a minute or 2 add the onion and fry on a medium heat.  Mix the other spices and paste together in a mug with a bit of water and when all mixed together, fill to the top of the mug with water. Add to the pan and allow the spices to cook out for a few minutes.  Add the ginger, garlic, 1/2 tsp salt and a few dashes of lemon juice too, stirring occasionally.

    Next add the chicken and coat thoroughly. Add the yogurt, vegetables and another mugful of water, less if you prefer the curry 'dryer'.  Cook on a medium heat for 15 minutes. Remove from the heat and add the potatoes to the curry.

    Meanwhile rinse the rice thoroughly in a sieve. Add to boiling, salted water. Add a good pinch of Saffron and cook as per packet instructions. Usually 10 minutes. Once cooked, drain into a sieve and pour over boiling water to rinse through.  Allow to cool.

    In a oven-proof dish, lay some rice on the bottom followed by 1/3 of the curry. Repeat twice finishing with some curry on top. All of this can be prepared in advance. 

    Cover with a lid or foil and bake in the oven at 190c fan for about 40-45 minutes.

    Serve up!

    WeightWatchers ProPoints Per Serving: 13